Uncategorized

Synoptic: Evaluation of Teamwork

In terms of the synoptic project, it was vital that we stay consistent and work as a team. Whether this meant keeping track of our work, helping out others, or just simple communication.

communication_is_key

Remember – Short Film & VFX

In my opinion, this project could have been formatted and organised considerably better than it was. This was nobody’s fault in particular, just a matter as we had drawn the short straw. We had team members in different classes, thus we had a disadvantage compared to other teams from the get-go. We used several platforms of communication on this project, including:

  • Google Drive / Docs
  • Facebook
  • Scrums

Google Drive was the main place that we communicated, obviously in person, too. But when we did not have direct access to one another, this is where it happened. It holds the majority of our files, and the documents which hold our individual tasks. This was where if you had work to do, you would find it listed here, and if you didn’t, you could allocate yourself work to do. Which, surprisingly, only I did.

Work Ethic & Getting the Job Done

All of our team members had good work ethic. They all wanted the best for the project. But, unfortunately, the work did not reflect this. For example, some work could be lazy, sloppy. but be written off as finished. Resulting in it having to be re-done. Several team members also lacked certain aspects of communication, leaving work that was not fit to the brief.

When it came to the final weeks of the project, there was a severe loss of communication within the team, in tandem with personal issues conflicting with the project. One of my roles in the final stages was co-editor (helping compile the final edit of the film), This meant I needed to communicate with each team member individually, to ensure that all pieces of work that had new editions, were exported and ready for me to use in a safe place. While for the most part this was alright, it was left very late for some effects to be given to me, which could also be an accident on my part, as I was concentrating heavily on my personal portfolio, which I soon came to realise. During this time, certain team members deliberately distanced themselves from the rest of the group, leaving a desire for communication, as well as a lot of frustration with the rest of the group. Other than that, the team communicated fairly well over this project. Other than a few hiccups I am pleased with how the project turned out.

Space Station Defense System – Top Down Shooter

This was my second project which, overall, I had less of an impact on. But I did still pull my weight and helped wherever possible. All of the members of this group were in my class, which made communication a lot easier than the short film. As well as using Google Drive, we were unique in using Mantis Bug Tracker.

“MantisBT is an open source issue tracker that provides a delicate balance between simplicity and power. Users are able to get started in minutes and start managing their projects while collaborating with their teammates and clients effectively.” – mantisbt.org

In layman’s terms, MantisBT is a platform in which you write down bugs and tasks for your team. As I involved myself more into the short film, I did my communication directly with the lead designer. Another reason I did this was because I did all of my tasks when asked of me, so there was no need for me to keep checking back. If he had an issue or something to bring up with me, he would speak to me directly. Which I appreciate.

The rest of the team, I didn’t really communicate with, however. I believe the main reason for this was because I had one of the more important jobs (the design aspect) and I heavily focused on this, while leaving the other team members to their work. I must also mention the fact that they spoke regularly together to synchronize their work and keep up to date with anything new they wanted doing. Unlike one team member. This member did not contribute a whole lot to the project.,If anything at all. He did not involve himself with the project whatsoever, which is concerning. However the other 2 members (and me) were able to deliver a high-quality product at the end. Reaching our MVP with ease and showing a graphically and technically sound game.

As a whole, communication was well in both projects. Admittedly,  there was some faults, but nothing goes perfectly. I am happy with how both projects turned out, but if I had to do it again, I would ensure that everybody does their work on time, to a high standard, and involves themselves with the project. To achieve an even higher quality product.

Jacob Scaife: Portfolio 2017

This is the culmination of all of my work for 2017, the 2nd year of next gen. This resulted in me gaining a Distinction for my work. I created this video inside Adobe After Effects and Premiere. I am very happy with how this year has turned out, especially in my chosen specialty.  I have enjoyed developing my skills and portfolio using and learning several different programs.

Programs I have learned this year:

  • Adobe After Effects CC
  • Adobe Premiere Pro CC
  • Autodesk Mudbox
  • Autodesk Maya
  • Unity (particle engine)

Inside the Head Scene – Redone

With the final show in a week (when our projects get assessed for the final time) we have to polish off all of our effects, to ensure they look the best that they can. As well as creating subtle new effects to add to the film.  Part of this work included the inside the head scene, which I mentioned in my portfolio video. That you can watch here, as well as a blog post.

To create a more atmospheric effect, I added several sound effects, as well as some animated fractal noise to imitate being inside of a body.  You can view the new version here:

When looking back at the old scene, I felt that it needed an overhaul. In terms of visuals, and audio. It did not give the effect of replicating being inside the head, which I was unhappy with.

Audio Enhancements:

  • Ambient Background Noise
  • Glowing Sounds
  • Higher Quality Vocals
  • Sound FX for Suitable Scenes

Visual Enhancements:

  • Memory Clouds Redone using Saber
  • Added Animated Noise to Background
  • Improved Rotoscoping & Masking


Synoptic Work: My Contribution

As a whole, I feel I have made a great impact on the short film, as well as the game. With the game, I created several visual effects assets that have been used such as explosions, projectiles, and rocket trails. All of which I created inside Unity’s built in particle engine. While I have created the final particles that will be used in the game, Conor is using placeholder explosions so he can focus on finishing the MVP (minimum viable product) before the deadline. My particles will be in on the final version.  Here is a gif of the rocket trails:

18716796_1541276815906014_2124805749_n.gif

As the particle effects/ helping Conor out with the visual and aesthetic side of the game was all that he required me to do, I focused heavily on the short film, as it is what I want to pursue outside/after college.

Remember – Short Film

The short film is where I allocated most of my time, contributing a lot to the team and the development of the project. For example, in the pre-production stage,  I gathered a selection of audio samples which we then sent on to our composer.Unfortunately I cannot share our soundtrack, as it is private as of now.  Here is the playlist we used, anyhow:

As well as this, I created a pre-vis and several vfx tests that we used to give ourselves some idea of what we wanted from the final product.

Previsualization (also known as previs, previz, pre-rendering, preview or wireframe windows) is a function to visualize complex scenes in a movie before filming.

Prologue Pre-Vis

VFX Tests

Credits Test – 3D Models + After Effects

This was just an idea, and practice of what I thought the credits could look like. Although we did not go with this idea,  it was still worth seeing what the possible outcome would be like.

3D Intro Test – Maya

As part of pre-production, we had to brainstorm some ideas of what certain scenes would look like. This was one of my ideas as part of the introductory sequence. While there would have been a more stylized model, it was just a basic version to propose the idea of this title.

Glowing Eye / Distortion Effect – After Effects

This was one of the most important tests done for this project, the reason being it was 2 tests in one. Using the distortion/glitch effect we used for the elevator scene and memory clouds scene, as well as glowing eyes.

Intro Text – Premiere

There is not alot to talk about with this test, it is an animated sequence of words. This was just a placeholder in the final composition until we did the final version.

 The Production Stage

As part of our assessment, we need formal documentation, this can be in a form of weekly tasks, a spreadsheet, etc. We created our own weekly tasks document that has been used throughout the project, and I created a behind the scenes film that also counts as documentation.

I enjoyed the production process, as it gave me experience with a camera, and filming with a group. I helped out with the camera, adding more shots/changing existing ones to work more with the footage we had. I feel like I was a great help during this. As well as helping, I had to record the behind the scenes footage. As we only had one camera, I recorded it with my phone (which recorded in 1440p).  The footage was filmed over 3 seperate days of filming (not all):

  1. Storyboarding & Practice Shots
  2. The Main VFX Sequence
  3. Act 1 Introduction Shots
  4. The Final Day

I created these all seperately at first, but then our Director, Josh made a suggestion that I make one video, including all of them, with a question and answer session at the end to give further insight into our project. You can view the video here:

Visual Effects

Originally, I was in charge of one effect. The memory clouds. This is part of the main visual effects sequence, inside of the head. The memory clouds had 2 forms, red and blue.  Unfortunately I cannot show the final product yet, because we have not released the film. But, you can see the breakdown of the initial effect.

Blue Memory Cloud Breakdown (not final)

After finishing this effect, I gave myself some more tasks. The iPhone message effect and breakdown. I wanted to do this from the start because I knew how I would do it too, and I thought it would be fun to do.  I have a full blog post about this effect, here. But I will explain it here too for convenience.

First, I had to create the text bubbles themselves. This was a case of using the pen tool to create the marker indicating who sent it, after some trial and error. I was able to come up with a good shape. Now I had to create the text. The original font that iPhone’s use is Helvetica Neue, but most recently San Francisco.

This slideshow requires JavaScript.

When it came to animating the bubbles, I had to make it one object (including the text). This meant using the pre-compose feature inside of after effects. This means turning your current composition into a usable layer on top of others. All I used to animate the bubbles after using the pre-compose feature, was scale.

Capture

For:

  • Scale: 0
  • Scale: 155

The reason I scaled it to 155, and not 100, was because I was not satisfied with the scale of the pre-comp when originally creating it. So instead of adjusting all of the individual layers, I just scaled the composition instead. This also made it easier to scale other bubbles too. Here is what the bubbles look like when animated:

GIF

It will be slower than usual, as it is a gif.

This next effect I had no intention of doing, in fact, this effect was not planned at all, it was a decision made “in the moment”.

Elevator Glitch Effect

While editing the full composition, Josh our Director, suggested that we could add some flickering lights to the scene to add suspense. I went one step further with it. I added some sound effects, flickering lights, and a distortion effect on the reflection to show an evil force behind.

Team Efforts

This is the part where I discuss how I think the team has done as a whole. For the most part, they have been resilient, and hard working. Getting their effects done on time, with no hassle. But some team members have not pulled their weight in certain areas and have made some situations awkward with how much unnecessary time spent on a simple effect. We have already been held up for around 1 month with the actors not showing up on time, or at all. This made us start filming by ourselves, and has already delayed us enough. Certain team members when having nothing to do, will just sit and watch instead of looking at the weekly jobs document and offering to do more work. I do not have an issue with taking time to do an effect, but if the time you spent on it does not equal the quality of your work then the time was wasted for the most part.  One team member has not showed up a lot of the time, and even when they did the work took a while to get done while others were getting along at a steady pace.

I think if these 2 team members were more consistent and spent more time on this project and less time on their personal portfolios, we would have had a higher quality product.

Overall I have enjoyed both projects, but felt I had more of an impact in the short film. I would have preferred using the actors, as we would not have been delayed whatsoever, and would have experienced actors instead of VFX artists acting.

iPhone Message VFX

I have created the effect that an iPhone message appears on the screen as he walks. Then, it is tracked to the phone in the next shot.

GIF

First, I had to create the text bubbles themselves. This was a case of using the pen tool to create the marker indicating who sent it, after some trial and error. I was able to come up with a good shape. Now I had to create the text. The original font that iPhone’s use is Helvetica Neue, but most recently San Francisco.

This slideshow requires JavaScript.

When it came to animating the bubbles, I had to make it one object (including the text). This meant using the pre-compose feature inside of after effects. This means turning your current composition into a usable layer on top of others. All I used to animate the bubbles after using the pre-compose feature, was scale.

I originally had two keyframes:

Capture

For:

  • Scale: 0
  • Scale: 155

The reason I scaled it to 155, and not 100, was because I was not satisfied with the scale of the pre-comp when originally creating it. So instead of adjusting all of the individual layers, I just scaled the composition instead. This also made it easier to scale other bubbles too. Here is what the bubbles look like when animated:

GIF

There is some lag in this, as it is a .GIF so it will not have the full effect.

Here is the final version:

and a breakdown:

Arnt Jensen – Limbo & Inside

In this post, I will be showing how one man’s idea can grow into something bigger. Arnt Jensen, the man behind the art and idea of Limbo and Inside.

What is Limbo and INSIDE?

Limbo is a puzzle-platform game developed by an independent studio named Playdead. Limbo is a 2d sidescroller, incorporating a physics system that governs environmental objects and the player. Inside (portrayed as INSIDE) is a puzzle-platform adventure game developed, and published by Playdead. The player controls a young boy in a dystopic world, solving puzzles while avoiding death in 2.5D sidescrolling fashion. 

Who is Arnt Jensen?

Arnt Jensen is the co-founder of the Danish game-development company Playdead, and the creator of Limbo and its spiritual successor, INSIDE.  Prior to this, he graduated university with a design degree and winning a concept artist job at IO Interactive.

1468920819-arnt-jensen-dino-patti-58cc7

Dino Patti & Arnt Jensen – Founders of PlayDead


During this placement, Arnt started drawing his own unique worlds filled with life and character.” I started drawing concept art without the boy, it was just this secret place. I really tried my whole life to get ideas, but when I drew the first drawing–it was like this is the place.” – Arnt Jensen

From the very get-go, Arnt Jensen set out three goals for this game.

  1. An Original Art Style
  2. Have two controls, jumping and grabbing.
  3. No tutorial text / help

Jensen wanted to create an aesthetic for the game that, while memorable, does not have to rely on high polygon 3D models. Instead opting for a minimalist. silent film era style. There is a clear resemblance to German Expressionism and silent films. This is a number of creative movements that started in Germany before the first world war. It reached a peak in the 1920s.  Many consider Limbo, a true piece of modern art. The landscape of Limbo seems dream-like.It is almost like you are playing in somebody’s imagination. Or simply, a distorted version of reality. As in later levels, you can see buildings in the background.

One of the many reoccuring aspects in Limbo are Spiders. This is because many parts of the game, including this, are straight out of the mind and childhood of Arnt. He struggles with severe arachnophobia explaining the gigantic spiders, and the forest areas coming from his childhood home – a farm.

Arnt did a very good job in storyboarding the game by himself before assembling his team. Which would come to be known as PlayDead.  Arnt had a clear view. A puzzle platformer. For several years he made his own prototype, started programming aswell as drawing concept art. But after 2-3 years of basic sprite programming and art, Arnt decided to try and assemble a team to help make his vision come to life. Arnt put together a short concept reel of art to show his ideas. This is the video below.

As considered by reviewers, the graphical side of Limbo is by far the most important aspect. The mind of Arnt Jensen put together a masterpiece of monochrome. A very slick film-grain filter ontop to give that extra subtle effect. While also focusing on lighting and focusing techniques. The usage of light, effects and forms in Limbo are externally used to create emotions for the player, to create their own stories while taking into account the main story, too. Tying back in to German Expressionism, the game links as it has “dreamlike levels that twist and and spin in upredictable angles“. It is an incredibely minimalistic art style, and is reminiscent of the work of Tim Burton, Edward Gorey, and Fritz Lang.

Tim Burton’s Inspiration

Looking at Tim Burton’s art, it is very stylised. As is Limbo. Dark colours, mainly black and white (monotone), figures placed increepy gestures and landscapes made of nightmares.

This slideshow requires JavaScript.

Just by comparing the two styles, you can see how heavily influenced Limbo is by this type of art. Horror, while being suitable for younger audiences at the same time. For example, using silhouettes to quickly preview characters and not revealing their true nature.

How does this all come together to create a game?

The main purpose of this investigation was to discover how an artist (Arnt Jensen) had displayed an imagined world and how this was portrayed into the games industry. In my case I talked about how Arnt created his own art, and style for the game while also keeping in mind core gameplay elements and mechanics. While this game is heavily focused on design (graphic and audio) it still plays like a very good game.

Plot

The game has a very sad plot, while tying in with the art style and name of the game. Which is taken from the latin for edge, “Limbus.” Limbo is also a term used for the afterlife, which also links in with the game. The game features a boy who wakes up and seeks out his missing sister. While interacting with people who will either talk to him, run away, or die. The player controls a boy and completes a plethora of puzzles along the way. Further pushing the idea of putting all the pieces together.

Arnt put alot of effort into this title. While not a triple-AAA game by any standard, it is still a masterpiece. Just how well all of the individual elements of the game come together in one way or another, creates a truely breathtaking experience of design. Even if you are looking at this game for the art or just gameplay, then you would not be dissapointed.


Sources

https://en.wikipedia.org/wiki/Limbo_(video_game)

http://uk.ign.com/articles/2010/09/14/how-limbo-came-to-life

http://www.popmatters.com/post/128981-worlds-without-words-what-german-expressionism-can-teach-us-about-ga/


Synoptic Project: Behind the Scenes

As part of the final documentation for our visual effects short film, we have to create a visual effects breakdown / behind the scenes film. At the end of the behind the scenes film, we will have a Q&A session with the Director, Josh. This gives further insight onto the project for those wanting it, and a more detailed analysis of the process of making a short film. I have created each behind the scenes video, 4 in total. Representing the story-boarding process, some practice shots, the main visual effects sequence, Act 1 and the final day of filming.

Main VFX Sequence

Final Day

Storyboarding 

Act 1 

Porfolio: Dark Matter Orb

At the end of the year we have to present a portfolio video displaying what we have done this year. Including: Technical Model, Synoptic Project and showing any work we have done in our focused area (mine being VFX).

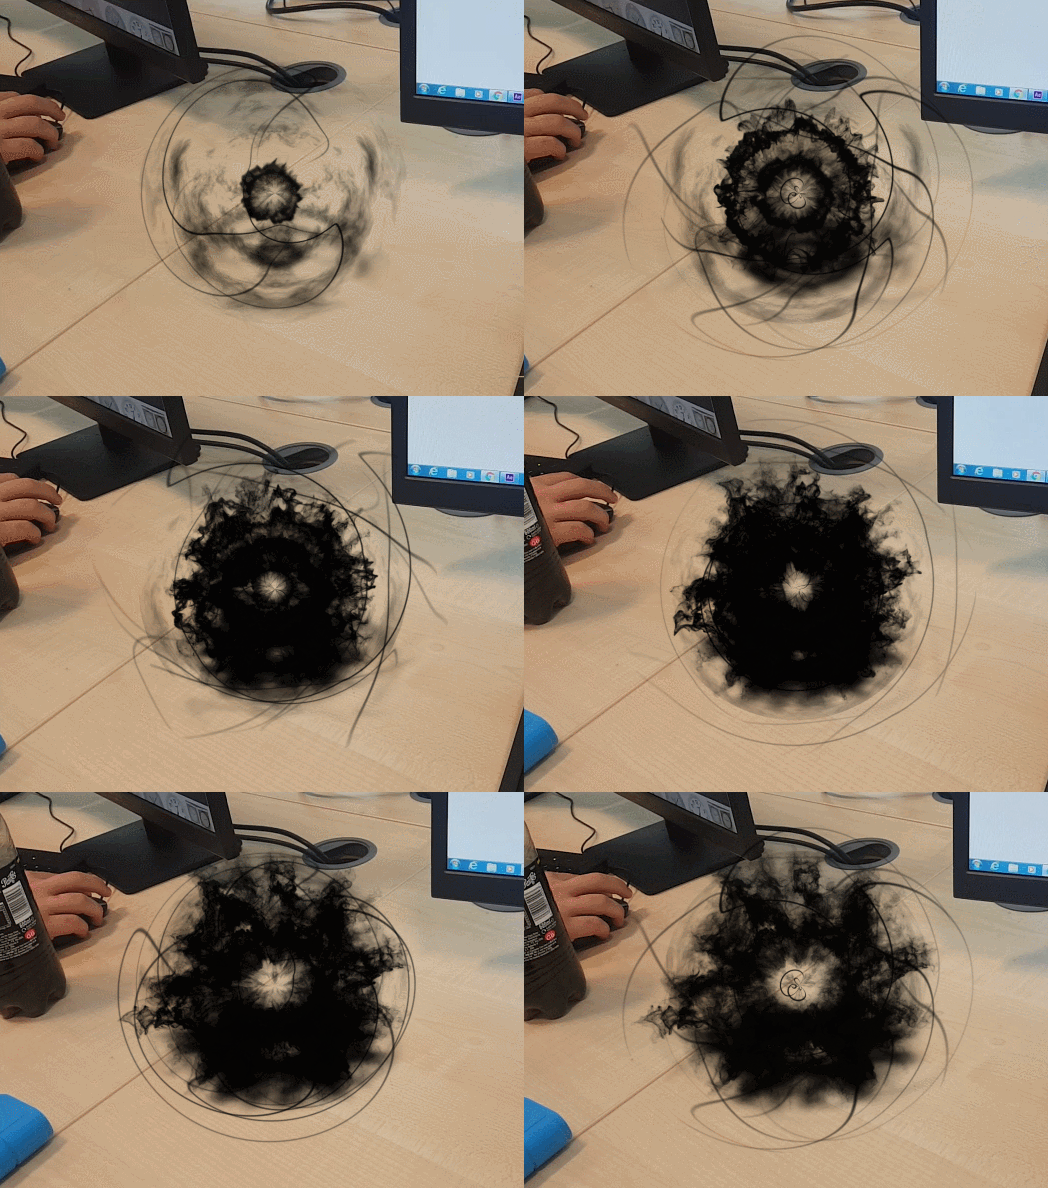
To add to my portfolio, I have created an orb of dark matter, as well as a ball of fire effect. I will be creating a breakdown of the ball of fire to show how it was done, but for now I will give a brief rundown of what I did

Dark Matter Orb

Here is the tracked version,as well as a distortion effect I added on the side:

How did I make this?

To start off, I created the creepy lines that spiral around the object. This was done with making simple lines with the pen tool, and adding the “Vegas” effect to soften the edges. Capture

I added Polar Coordinates to make a circle effect and animated the rotation, to get the spiral effect.

Now for the explosion. This consisted of alot of stock footage by Video Copilot , repeated at delayed intervals.

GIF

When added to the spirals, I get this effect.

GIF


With a few things added here and there, like animated fractal noise. I also had to track the orb to the table to it did not just stay in place if the camera moved. Hvae a look at the final result below:


If I was to recreate this effect, I would have improved the track. But as a side project, I am fairly happy with it. I am gradually getting better with After Effects and I am making significant progress with my skills.